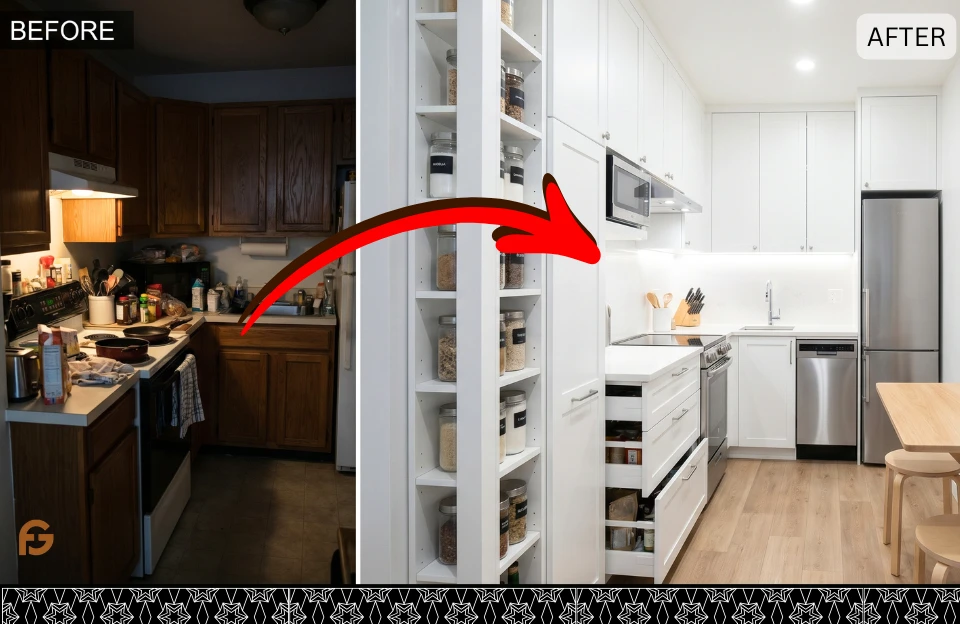
A tiny kitchen doesn’t have to mean compromising on functionality, style, or your love of cooking. While working with limited square footage presents genuine challenges, the rise of micro-living, urban apartments, and tiny homes has sparked incredible innovation in small kitchen design that proves size isn’t everything.
The secret to a successful tiny kitchen lies in strategic planning, smart storage solutions, and design choices that maximize every single inch. When space is at a premium, each decision carries weight. The right layout, appliances, storage systems, and visual tricks can transform even the most cramped cooking space into an efficient, beautiful area you’ll actually enjoy using.
In this comprehensive guide, we’ll explore 15 proven tiny kitchen design ideas that combine functionality with aesthetics. These aren’t theoretical concepts from design magazines that ignore real-life constraints. These are practical, tested strategies that work in actual small kitchens, from studio apartment galley kitchens barely wide enough for one person to compact condo kitchens where every cabinet and drawer counts.
1. Embrace the Galley Layout for Maximum Efficiency
The galley kitchen layout with parallel counters on opposite walls is often the most efficient design for tiny spaces, creating a natural work triangle that minimizes unnecessary movement.
Why Galley Layouts Excel in Small Spaces
Linear workflow places everything within arm’s reach, allowing you to pivot between sink, stove, and refrigerator without wasting steps in a cramped space.
Double the counter space compared to L-shaped or one-wall layouts when you utilize both sides of the galley, maximizing your precious work surfaces.
Clear traffic flow through the center aisle keeps the kitchen functional even when multiple people need access, provided you maintain adequate aisle width.

Optimizing Your Galley Kitchen
Maintain a 42-48 inch aisle width between opposing counters for comfortable movement and the ability to open appliances and cabinets without obstruction.
Place the sink and stove on one side with the refrigerator on the opposite wall to create efficient work triangles that don’t require constant crossing back and forth.
Use consistent cabinet heights on both sides to create visual symmetry that makes the narrow space feel more intentional and less cramped.
Light-colored cabinets on both walls prevent the galley from feeling like a tunnel, keeping the space bright and open despite the parallel configuration.
2. Install Floor-to-Ceiling Cabinets for Vertical Storage
When floor space is limited, the only direction to expand is upward. Floor-to-ceiling cabinetry dramatically increases storage capacity without consuming additional square footage.
The Vertical Storage Advantage
Doubled storage capacity compared to standard cabinets that stop at 84 inches or lower, giving you space for items you don’t use daily but still need to store.
Visual height created by tall cabinets draws the eye upward, making tiny kitchens feel larger by emphasizing ceiling height rather than limited floor area.
Eliminating dust traps above cabinets means less cleaning and a more finished, intentional appearance that elevates the entire space.

Making Tall Cabinets Work
Use upper shelves for seasonal items, specialty appliances, bulk purchases, or entertaining pieces you access infrequently, keeping everyday items at comfortable heights.
Install pull-down shelving systems in the highest cabinets to bring contents within reach without step stools, making tall storage genuinely functional.
Choose light-colored cabinets or glass-front uppers near the ceiling to prevent tall cabinets from feeling overwhelming or making the kitchen cave-like.
Maintain consistent cabinet style from floor to ceiling for cohesive aesthetics that make the tall cabinets look intentional rather than awkwardly added.
3. Choose Slimline and Compact Appliances
Standard-sized appliances were designed for standard kitchens, but compact alternatives deliver full functionality in smaller footprints, perfect for tiny kitchen design.
Space-Saving Appliance Options
18-inch dishwashers instead of standard 24-inch models save six precious inches while still accommodating 6-8 place settings, sufficient for most small households.
24-inch ranges or even 20-inch models reduce the footprint of your cooking surface while maintaining four burners and a full oven.
Counter-depth refrigerators sit flush with cabinets rather than protruding into the room, creating streamlined appearances and better traffic flow in narrow kitchens.
Combination appliances like microwave-convection oven combos or refrigerators with built-in ice makers eliminate the need for separate units.
Drawer dishwashers and refrigerator drawers fit into base cabinets, providing appliance functionality without the visual bulk of full-size units.

Strategic Appliance Placement
Integrate appliances with cabinet panels for seamless built-in looks that make tiny kitchens feel more spacious and less cluttered with visible equipment.
Elevate smaller appliances by installing microwave ovens at wall height instead of counter level, freeing valuable work surfaces for food preparation.
Choose European-style appliances, which often come in slimmer profiles than American standards, while maintaining quality and performance.
4. Utilize Every Inch with Pull-Out Storage Solutions
Hidden pull-out organizers transform awkward cabinet spaces into highly functional storage, making every cubic inch of your tiny kitchen work harder.
Essential Pull-Out Systems
Pull-out pantries fit into narrow 6-9 inch gaps between appliances, providing surprisingly spacious storage for canned goods, spices, and dry ingredients in otherwise wasted space.
Two-tier pull-out drawers in base cabinets effectively double storage capacity by utilizing vertical space within cabinets while keeping everything visible and accessible.
Corner pull-out systems solve the problem of blind corner cabinets where items disappear into black holes, bringing contents fully into view with smooth mechanisms.
Under-sink pull-outs organize cleaning supplies, trash, and recycling in the typically chaotic under-sink area, maximizing this prime cabinet real estate.
Vertical tray dividers that pull out keep baking sheets, cutting boards, and platters organized vertically rather than stacked horizontally, where you can’t access lower items.

Installation Considerations
Invest in quality hardware with smooth glides rated for the weight you’ll store, ensuring pull-outs operate smoothly for years despite daily use.
Measure precisely before ordering pull-out systems, accounting for door thickness, hinge space, and plumbing obstacles that might interfere with mechanisms.
Organize by frequency with everyday items in the most accessible pull-outs and occasional-use items in less convenient locations.
This reminds us of a related concept we covered in our post on interior design.
5. Opt for Open Shelving to Create Visual Space
Open shelving makes tiny kitchens feel more spacious by eliminating the visual weight of upper cabinets while providing easily accessible storage for everyday items.
Benefits of Open Shelving
Visual expansion occurs when walls are visible behind shelves rather than blocked by solid cabinets, tricking the eye into perceiving more space.
Easy access to frequently used items means no cabinet doors to open or close, streamlining your cooking workflow in a small space where efficiency matters.
Decorative opportunity allows you to display attractive dishware, glassware, and kitchen accessories as functional decor that adds personality to your tiny space.
Cost savings compared to upper cabinets make open shelving budget-friendly for renovations or new builds where every dollar counts.
As a side note, if you’re looking to improve your finances overall, check out our guide on budgeting.

Making Open Shelving Work
Edit ruthlessly and display only attractive, coordinated items in good condition. Open shelves showcase everything, so visual clutter becomes room clutter.
Use matching containers for dry goods, creating uniform appearances that look intentional rather than chaotic, with items like glass jars with wooden lids adding cohesive style.
Install floating shelves rather than bracket-supported versions for the cleanest look that maintains the light, airy aesthetic you’re trying to achieve.
Mix with closed storage by replacing only some upper cabinets with open shelves, maintaining concealed storage for less attractive but necessary items.
Limit to one or two walls to prevent the space from feeling too exposed or requiring excessive organizational maintenance.
6. Install a Wall-Mounted Fold-Down Table
Fold-down tables provide full dining or prep surfaces when needed but disappear against walls when not in use, perfect for tiny kitchens where space is at an absolute premium.
Fold-Down Table Advantages
Zero floor footprint when folded allows free movement through tight spaces, with the table appearing and disappearing based on immediate needs.
Instant workspace for meal prep, dining, or even laptop work transforms with a simple motion, making your tiny kitchen genuinely multifunctional.
Permanent installation means the table is always available without requiring storage elsewhere or setup effort.

Installation and Design
Mount at appropriate heights with 30 inches from the floor for dining tables or 36 inches for counter-height prep surfaces, based on your primary use.
Choose durable materials like sealed wood, butcher block, or laminate that withstand daily use and occasional moisture exposure.
Add folding legs or support brackets that lock securely when extended, ensuring stability when the table is loaded with dishes or cutting boards.
Incorporate storage underneath with small shelves or hooks for items you use with the table, keeping them accessible and organized.
7. Maximize Corner Spaces with Smart Solutions
Corner cabinets are notoriously difficult to use efficiently, but modern corner storage solutions transform these awkward spaces into highly functional areas.
Corner Cabinet Solutions
Lazy Susan turntables bring corner cabinet contents to you with a simple spin, making everything visible and accessible without reaching into dark depths.
Magic corner systems with pull-out shelving that swings forward bring the entire cabinet contents into full view, utilizing every inch of corner space.
Diagonal corner sinks with angled cabinet fronts create accessible storage on both sides while utilizing the corner for the sink installation.
Corner drawers that pull out at angles provide surprisingly good access to corner spaces while maintaining attractive cabinet fronts.
Corner appliance garages tuck small appliances into corners with retractable doors, keeping them accessible but out of sight when not needed.

Corner Design Strategy
Plan early by incorporating corner solutions during the design phase rather than trying to retrofit them into existing layouts.
Invest in quality mechanisms since corner systems involve more complex hardware that needs to operate smoothly despite frequent use.
Reserve corners for items you use regularly enough to justify the slightly more involved access compared to standard cabinets.
8. Use Light Colors and Reflective Surfaces
Color choices and surface materials profoundly impact how spacious tiny kitchens feel, with light colors and reflective finishes creating optical expansion.
The Psychology of Light Colors
White cabinets reflect maximum light, making small kitchens feel brighter and more open than dark cabinetry that absorbs light and creates visual weight.
Light countertops in white, cream, or light gray extend the bright, airy feeling throughout the space, maintaining visual flow.
Pale backsplashes continue the light palette vertically, preventing dark horizontal bands that visually chop small spaces into even smaller segments.

Reflective Surface Strategy
Glossy cabinet finishes reflect more light than matte surfaces, amplifying the space-expanding effect of light colors, though they show fingerprints more readily.
Glass-front cabinets allow light to penetrate through to the cabinet interiors, creating depth and preventing solid upper cabinets from feeling heavy.
Mirrored backsplashes or glass backsplashes with metallic backing reflect light and create the illusion of depth, visually doubling the kitchen.
Stainless steel appliances add reflective surfaces that bounce light while coordinating with modern aesthetics common in small space design.
Polished hardware in chrome, brushed nickel, or brass adds small reflective moments throughout the space.
Avoiding the Sterile Look
Add warmth with wood tones in flooring, open shelving, or butcher block countertops to prevent all-white kitchens from feeling cold or clinical.
Incorporate texture through subway tiles, shaker-style cabinets, or textured backsplashes that add interest without darkening the space.
Use strategic color in accessories, small appliances, or a single accent wall to inject personality while maintaining the light foundation.
9. Incorporate Multi-Functional Furniture and Features
Multi-purpose elements maximize the utility of every item in tiny kitchens, ensuring each piece earns its place by serving multiple functions.
Multi-Functional Kitchen Elements
Kitchen islands on wheels provide extra prep space, storage, and dining surfaces while being movable to create open floor plans when needed.
Breakfast bars attached to walls or islands serve as dining areas, workspace, and casual gathering spots without requiring separate tables.
Storage ottomans or benches with lift-up seats provide seating plus hidden storage for kitchen linens, small appliances, or pantry overflow.
Cutting boards that fit over sinks create temporary additional counter space exactly where you need it during food prep.
Nesting tables or expandable surfaces that grow when entertaining but shrink for daily use adapt to changing space needs.

Strategic Multi-Function Planning
Prioritize flexibility when choosing furniture and features, selecting items that adapt to different uses rather than single-purpose pieces.
Think vertically with elements like fold-up ironing boards, pull-down desks, or Murphy-style features that use wall space when active but disappear when not.
Combine storage with seating wherever possible, making benches, stools, and chairs do double duty.
10. Maximize Natural Light with Strategic Window Treatments
Natural light makes tiny kitchens feel significantly more spacious, and window treatment choices can maximize or minimize this crucial element.
Window Treatment Strategy
Minimal coverings that don’t block light when open are essential. Choose roller shades or Roman shades that pull completely up into compact valances.
Sheer fabrics provide privacy while allowing light to filter through, perfect for kitchens facing neighboring buildings or busy streets.
No treatments at all on windows that don’t require privacy, maximize light input, and maintain the cleanest, most open aesthetic.
Top-down shades lower from the top of windows, providing privacy at eye level while allowing natural light in from upper portions.

Window Maximization
Keep windowsills clear of clutter to allow maximum light penetration and maintain clean sight lines that make spaces feel larger.
Use light-colored trim that blends with walls rather than dark frames that create visual barriers and chop up the space.
Position reflective surfaces like mirrors or glossy backsplashes opposite windows to bounce natural light deeper into the kitchen.
Extend curtain rods beyond window frames when treatments are necessary, allowing them to pull completely clear of the glass when open.
11. Install Under-Cabinet and Task Lighting
Layered lighting is crucial in tiny kitchens where every surface must be functional, with targeted task lighting ensuring adequate illumination for cooking activities.
Essential Kitchen Lighting Layers
Under-cabinet LED strips eliminate shadows on countertops cast by overhead lighting, making food prep safer and easier while adding modern ambiance.
Recessed ceiling lights provide general illumination without the visual bulk of hanging fixtures that can make low ceilings feel oppressive.
Pendant lights over islands or breakfast bars, add style and focused light for dining or detailed tasks, serving as both functional and decorative elements.
Interior cabinet lighting with motion-activated LED strips makes finding items in deep cabinets easier while adding a luxury feel.

Lighting Design Principles
Layer multiple sources rather than relying on a single overhead fixture, creating flexible lighting that adapts to different activities and times of day.
Choose warm color temperatures (2700-3000K) for inviting atmospheres, avoiding cool blue-toned bulbs that can make small spaces feel institutional.
Install dimmers wherever possible to adjust light levels based on activity, creating bright task lighting for cooking and soft ambient lighting for dining.
Hide light sources with recessed fixtures or concealed LED strips to maintain clean aesthetics without visible bulbs or fixtures cluttering the visual field.
12. Create the Illusion of Space with Strategic Mirrors
Mirrors are powerful design tools in tiny kitchens, creating the perception of doubled space while reflecting light to brighten even the darkest corners.
Mirror Placement Strategies
Mirrored backsplashes behind stoves or sinks visually extend the kitchen, though they require frequent cleaning and must be used with heat-resistant materials near cooking surfaces.
Cabinet door mirrors on select upper cabinet doors add reflective moments without committing to large mirrored surfaces that might feel overwhelming.
Decorative mirrors on walls opposite windows reflect natural light and outdoor views, bringing more brightness and visual interest to solid walls.
Mirrored cabinet interiors create surprising moments of expanded space when opening cabinets, while serving the practical purpose of checking appearance while cooking.

Mirror Material Options
Antique mirrors with slight distortion and patina add character while maintaining the space-expanding benefits of reflective surfaces.
Smoked mirrors or tinted mirrors in bronze or gray provide reflective qualities with less stark brightness than clear mirrors.
Mirror tiles rather than solid sheets create interesting patterns while being easier to install and replace if damaged.
Mirror Limitations
Avoid overuse, as too many mirrors can feel disorienting or gimmicky rather than genuinely expanding the space.
Consider cleaning since mirrors show smudges and splatters readily, requiring more maintenance than standard backsplash materials.
Work with your style as mirrors suit contemporary and glam aesthetics better than traditional or rustic kitchen designs.
13. Organize with Pegboards and Wall-Mounted Storage
Wall-mounted storage systems keep frequently used items accessible while freeing precious drawer and cabinet space for items that must be concealed.
Wall Storage Solutions
Kitchen pegboards painted to match your decor hold pots, pans, utensils, and small tools on customizable hooks that adapt as your needs change.
Magnetic knife strips mounted to walls safely store knives while freeing up counter space and drawer organizers.
Hanging rails with S-hooks provide flexible storage for utensils, measuring cups, dish towels, and frequently grabbed items.
Wall-mounted spice racks keep seasonings organized and visible, eliminating the cabinet-diving required with traditional spice storage.
Floating shelves display attractive items while providing functional storage for everyday dishes, glasses, or ingredients in pretty containers.

Installation Best Practices
Mount to studs or use appropriate wall anchors rated for the weight of items you’ll hang, ensuring safety and longevity.
Group by function with prep tools near the main work area, cooking utensils near the stove, and cleaning items near the sink.
Keep it edited by hanging only items you use regularly, preventing wall storage from becoming visual clutter.
Coordinate aesthetics with matching containers, uniform hooks, or consistent materials that create cohesive appearances rather than random collections.
14. Choose Skinny Solutions for Narrow Spaces
Narrow furniture and slim storage specifically designed for tight spaces make use of gaps and margins that standard-sized items can’t accommodate.
Skinny Storage Options
Slim rolling carts just 6-10 inches wide slide into gaps between appliances or cabinets, providing surprising storage capacity in otherwise wasted space.
Narrow pull-out pantries in 9-12 inch widths hold significant quantities of canned goods, bottles, and dry ingredients while fitting spaces too narrow for standard cabinets.
Skinny floating shelves 6-8 inches deep along walls provide display and storage without the bulk of standard 12-inch depth shelving.
Slim trash and recycling solutions designed for small kitchens fit into narrow cabinet bases or pull out from beside appliances.
Tower storage with narrow footprints and vertical orientation maximizes storage height while minimizing floor space consumption.

Making Narrow Work
Measure carefully before purchasing to ensure skinny solutions actually fit your specific gaps and don’t create new problems.
Organize thoughtfully since narrow storage limits what fits, requiring strategic decisions about what merits space in tight quarters.
Ensure accessibility with pulls or handles that allow easy opening, even in tight configurations where standard knobs might interfere.
15. Implement Smart Kitchen Technology
Smart technology adds functionality to tiny kitchens without requiring additional space, making small areas more efficient through innovation rather than square footage.
Space-Saving Smart Features
Induction cooktops require no ventilation hood or gas lines while providing precise temperature control and easy cleaning, with some models built into countertops that appear solid when not in use.
Smart faucets with touchless activation or voice control reduce counter clutter by eliminating separate soap dispensers while improving hygiene.
Motion-sensor cabinet lighting illuminates interiors automatically when opening cabinets, eliminating the need for manual switches or finding items in dark spaces.
Smart vents and fans monitor air quality and activate automatically, keeping tiny kitchens fresh without occupying mental bandwidth.
Compact smart appliances like air fryer-toaster oven combinations or multi-cookers replace multiple single-purpose appliances with one smart unit.

Technology Integration
Plan electrical carefully during design to accommodate smart features without visible cords or adapters cluttering the space.
Choose compatible systems that work together through single apps or voice assistants rather than requiring multiple incompatible technologies.
Prioritize useful over gimmicky features, ensuring technology genuinely improves your tiny kitchen experience rather than adding complexity.
Maintain simplicity in the user interface so technology enhances rather than complicates daily cooking activities.
Bringing Your Tiny Kitchen Together
Creating a functional, beautiful tiny kitchen requires thoughtful integration of the strategies we’ve explored. Success doesn’t mean implementing every idea, but rather selecting the solutions that best address your specific space challenges and lifestyle needs.
Planning Your Tiny Kitchen Design
Start with accurate measurements of your space, noting not just length and width but also ceiling height, window locations, door swings, and any immovable obstacles.
Identify your priorities based on how you actually use your kitchen. Someone who loves cooking needs different solutions than someone who primarily reheats takeout.
Create a realistic budget that accounts for both materials and labor, recognizing that some smart storage solutions require professional installation.
Design for your future by considering how your needs might evolve, building in flexibility where possible.
Making Design Decisions
Favor quality over quantity when space and budget are limited, investing in fewer, better items rather than filling the kitchen with mediocre solutions.
Maintain visual cohesion through consistent materials, finishes, and colors that make the small space feel intentional rather than haphazard.
Build in storage everywhere possible, using vertical space, corners, gaps, and unconventional areas to maximize capacity.
Keep it simple with clean lines and minimal ornamentation that prevents visual clutter in tight quarters.
Living with Your Tiny Kitchen
Edit ruthlessly and regularly, keeping only items you genuinely use and love while purging duplicates and rarely-used gadgets.
Establish routines for cleaning and organization, since tiny kitchens show mess and disorder more readily than spacious ones.
Embrace constraints as creative challenges rather than limitations, finding satisfaction in efficient, clever design.
Celebrate your space by making it beautiful as well as functional, proving that tiny can be mighty.
Final Thoughts: Small Space, Big Possibilities
Your tiny kitchen holds incredible potential despite its compact dimensions. The 15 design ideas we’ve explored provide a comprehensive toolkit for maximizing space, enhancing functionality, and creating beauty in even the smallest cooking areas.
Remember that the most successful tiny kitchen designs evolve. Start with foundational elements like layout and major appliances, then refine with storage solutions, lighting, and finishing touches as you discover how you actually use the space.
The goal isn’t creating a magazine-perfect showpiece that you’re afraid to use. It’s designing a tiny kitchen that works beautifully for your real life, supports your cooking style, and satisfies you every time you open the door.
Your compact kitchen can be efficient, stylish, and genuinely enjoyable to use. With smart design choices and the strategies we’ve covered, you have everything needed to transform your tiny space into a mighty kitchen.

I’m Shaheen, the writer behind every article on FahadsGuide. I research and write practical guides on budgeting smarter, setting up better living spaces, using AI tools effectively, and building daily habits that actually stick. Background in motivational content on YouTube.Every article is researched and written to be genuinely useful, not just readable.